The HYP-E is more than just another helmet – it is a statement for modern, stylish and more sustainable mobility. Its features are therefore completely dedicated to the needs of urban commuters.
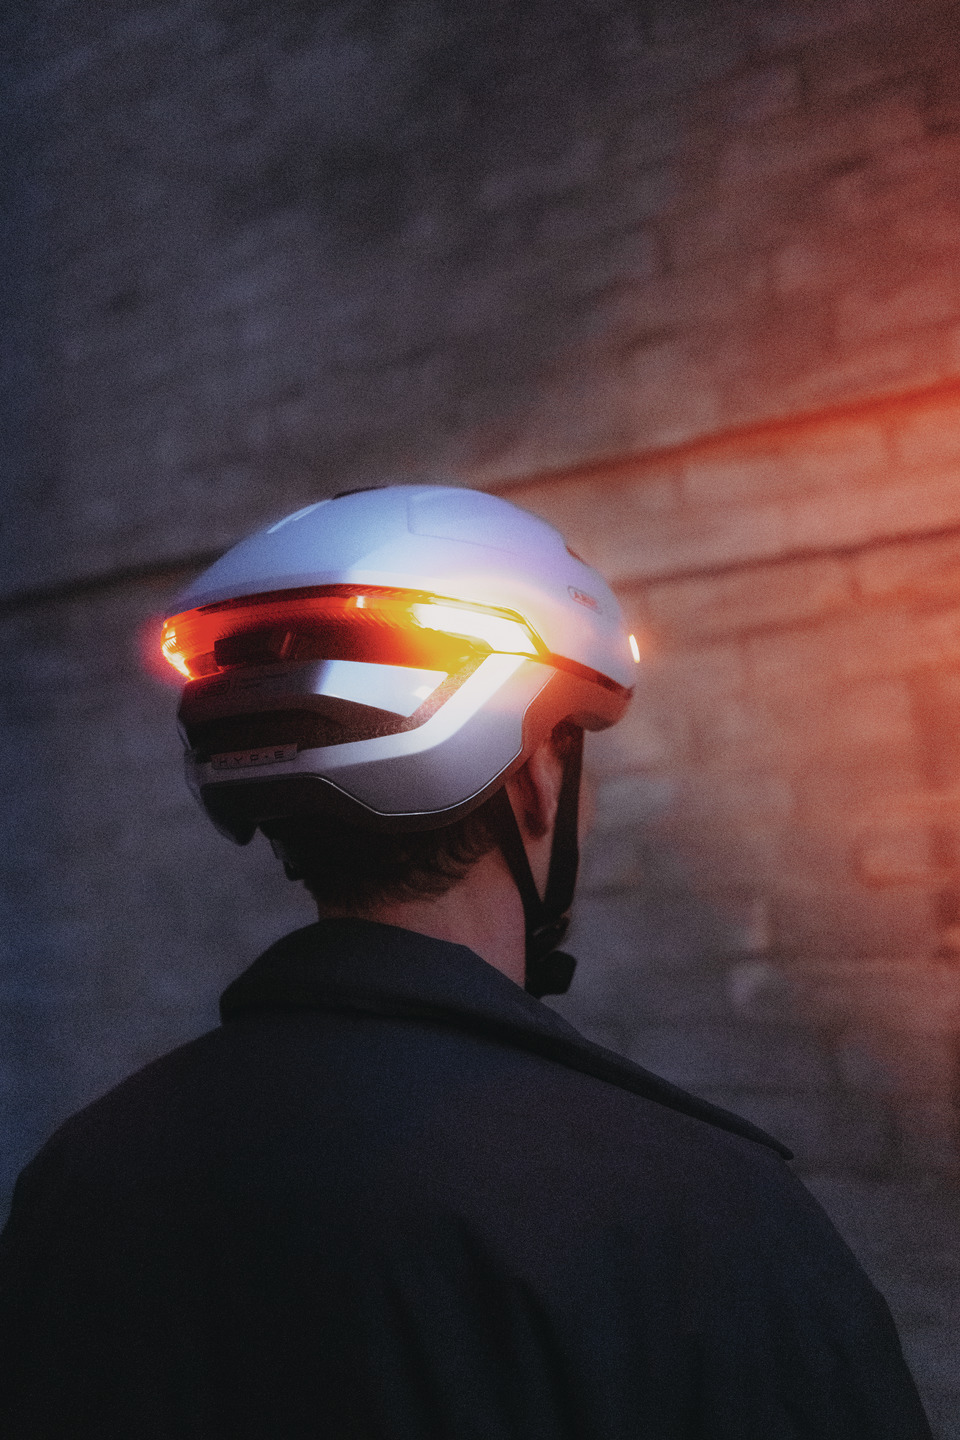
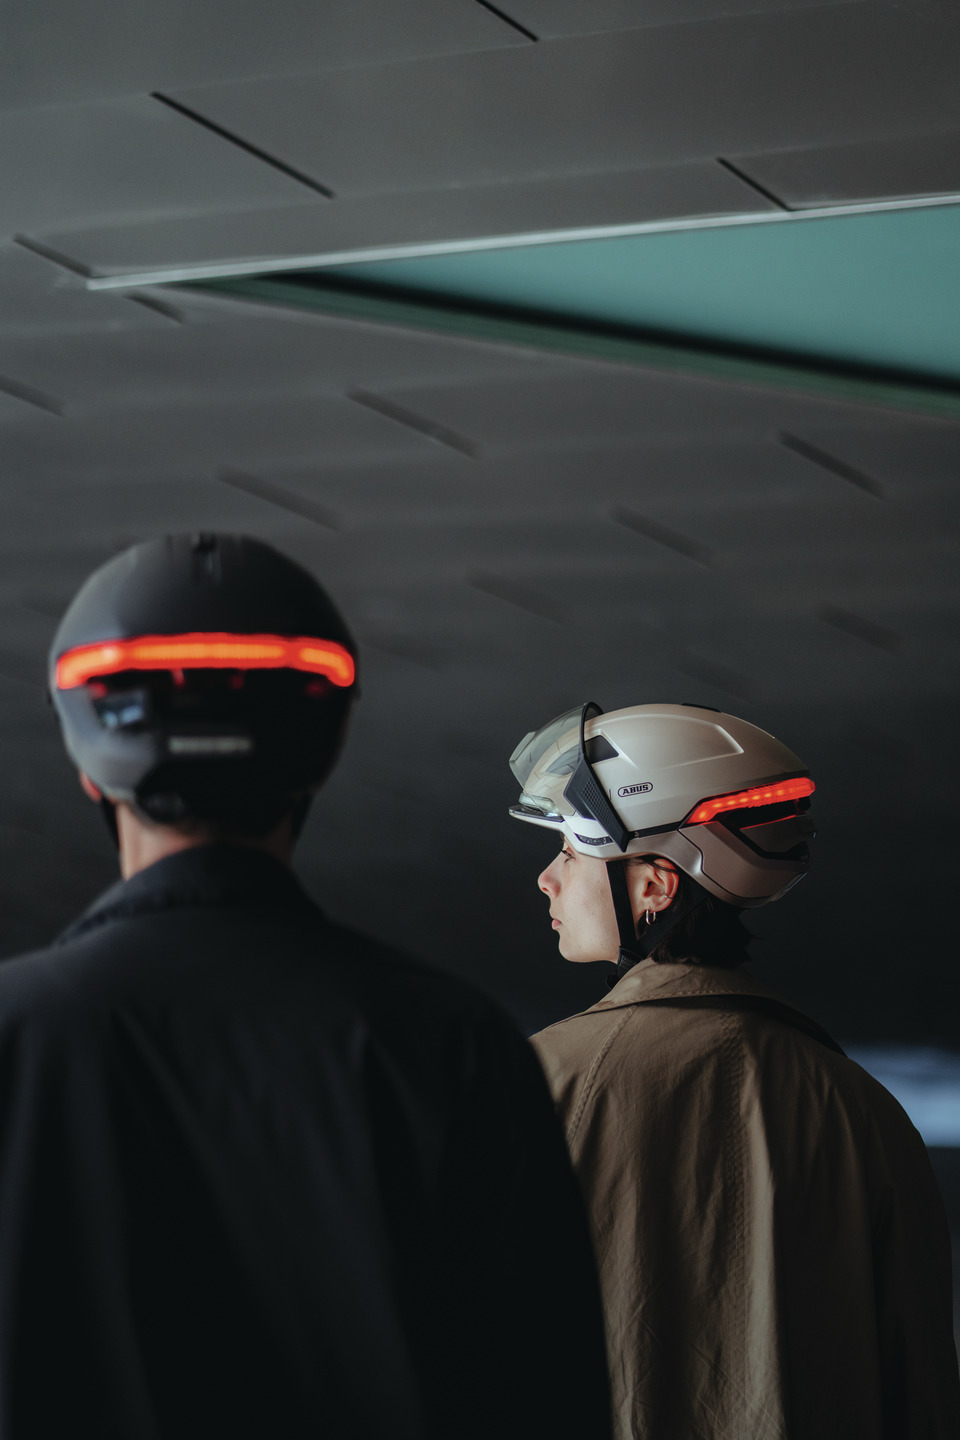
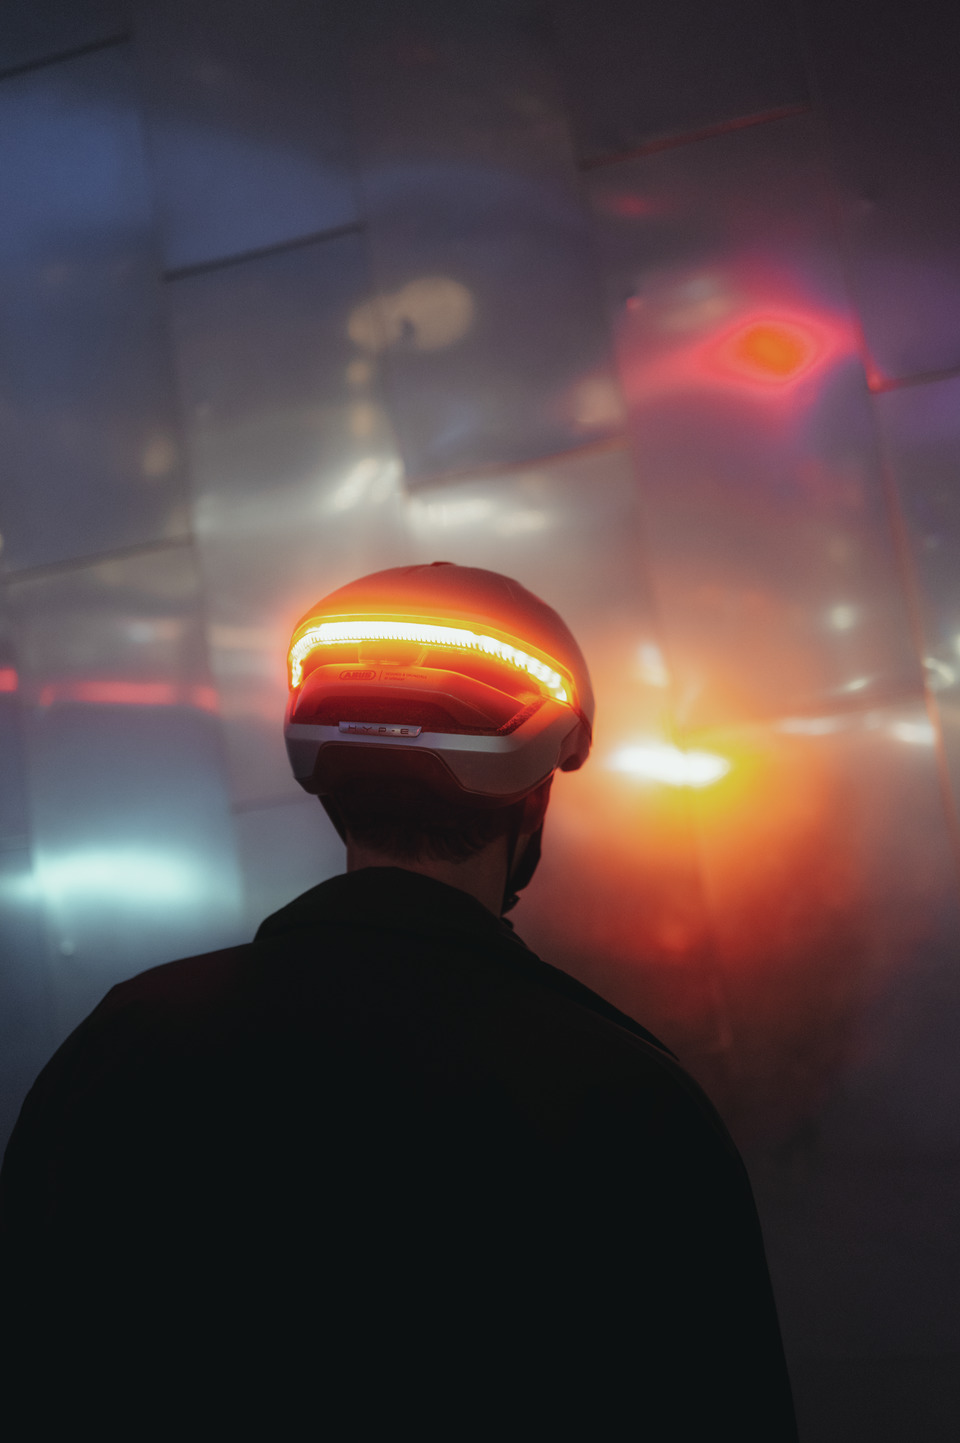
Front and rear lights significantly increase your presence in traffic, so you can move safely and with peace of mind – choose from various lighting modes.
Increased interaction
Dynamic light signals show other road users what you're about to do – intuitively control the turn signals using the wireless handlebar remote control.
Improved comfort
If the weather changes, you can easily open or close the ventilation ports using the integrated vent cover – for maximum flexibility, 365 days a year.
For greater peace of mind
Missing bike lanes, tricky turns, and heavy traffic – in these situations, the remote and turn signal ensure clear communication.
Designed for pedal-assisted bicycles
More motorized bikes, more accidents: With NTA certification, the HYP-E is especially suitable for e-bikes and higher speeds.
All year round
A few meters can make all the difference. That’s why the HYP-E enhances your visibility and safety in fog, low light, or rain.
Share
Description
HYP-E
The basis for flexible upgrades
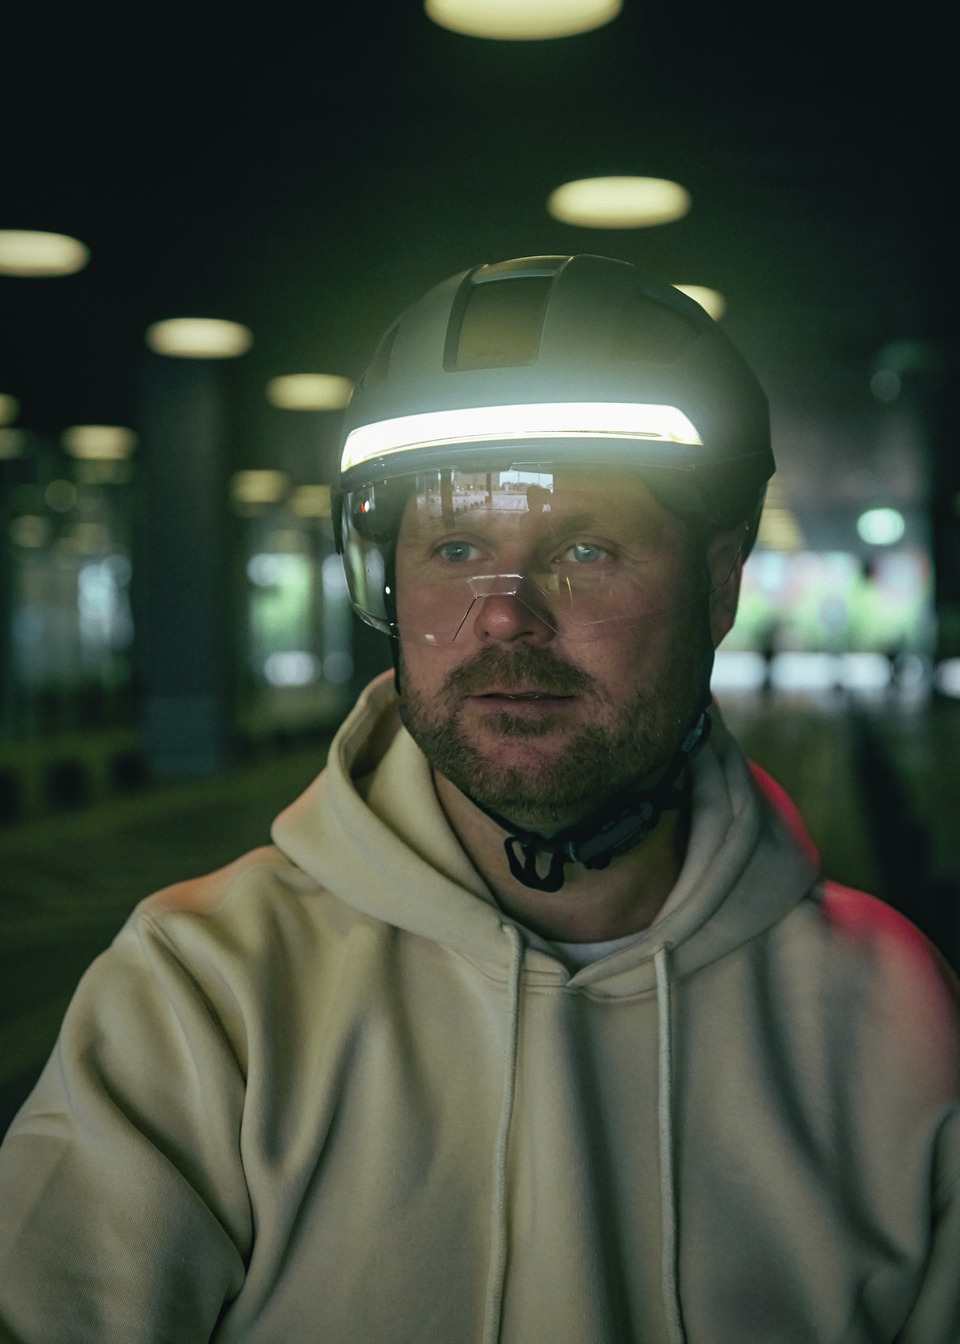
With the HYP-E you are not only seen – you are understood. Discover a helmet that revolutionises the interaction between cyclists and other road users.
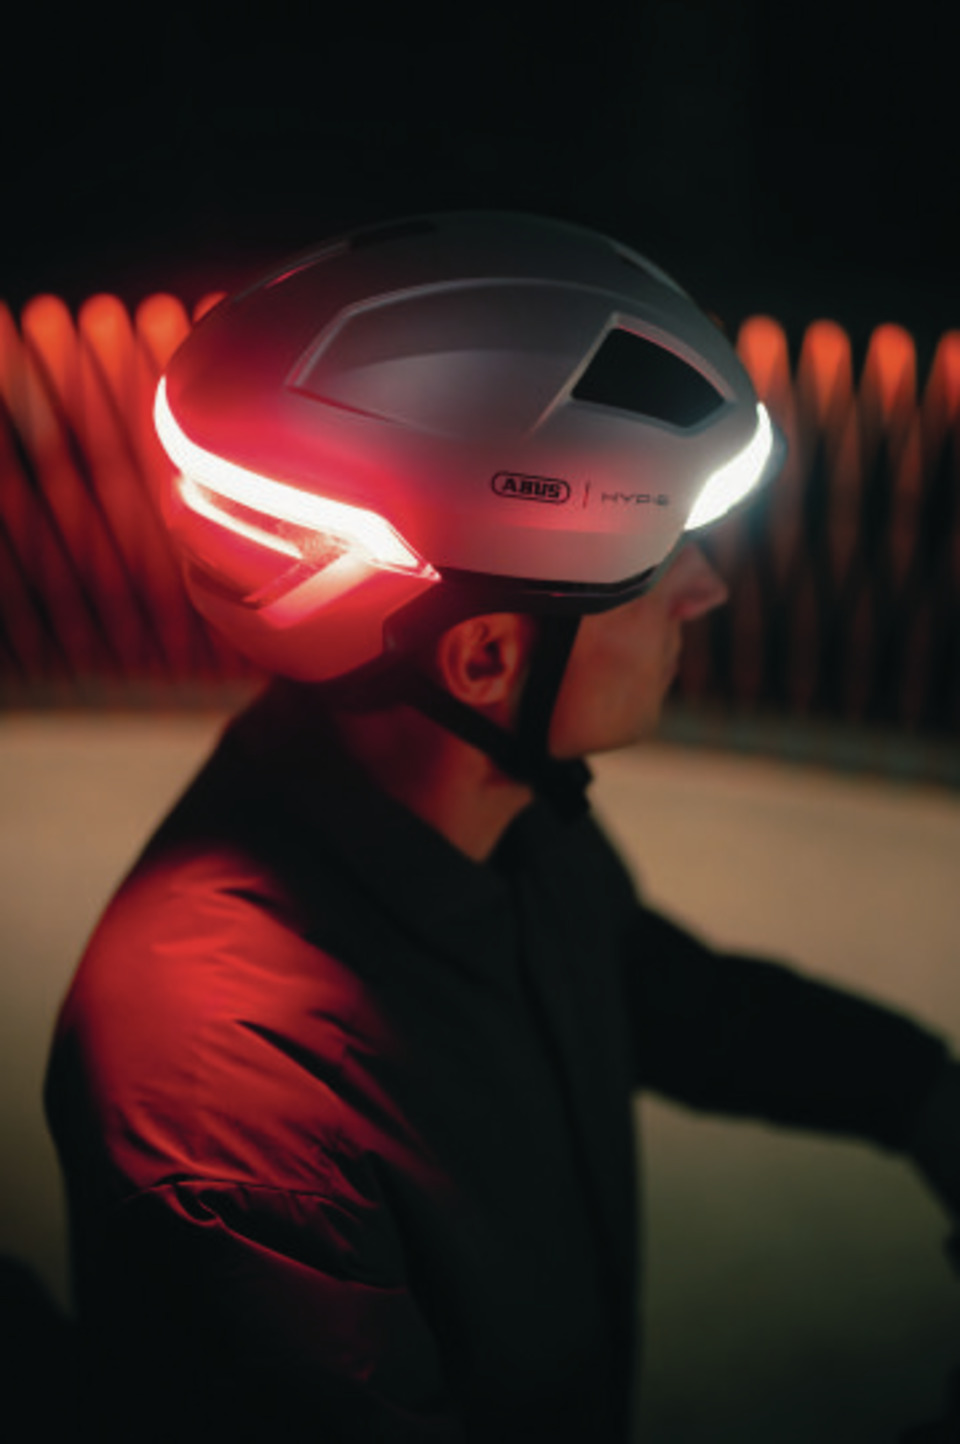
Thanks to modern light technology with intuitive remote control, you are not only more visible, but can also clearly communicate your intentions, such as turning or changing lanes. The light concept comprising Rear Light, Front Light and Indicator Lights noticeably increases your presence in traffic so that you can ride safely and stay relaxed. The lights are integrated into the multishell design of the HYP-E and emphasise its premium look and feel.
More protection on e-bikes
The HYP-E also fulfils the strict requirements of NTA standard 8776 – helmets that comply with the NTA standard are tested at higher impact speeds, offer better protection in the area at the back of the head and temples and can absorb higher impact forces.
With the HYP-E, you can rely on innovation, safety and style – for a completely new riding experience.
Upgrade your HYP-E model
The HYP-E is the ideal basic version:
The remote control indicator light is already included. Want more? No problem: with optional accessories like ear pads, magnetic visors in various tints, or a brake light remote, you can customize your helmet to fit your needs.
To view this content, you must agree to the use of cookies.
Reliable communication
The turn signal and remote communicate via a 2.4 GHz wireless protocol based on OXI Wireless technology.
The system works simply and smoothly – with no potential interference from apps, Bluetooth®, or Wi-Fi. The remote and turn signal come pre-paired, and a USB-C cable for recharging is included in the box.
Lower edge protection: polycarbonate (PC) outer shell covers the lower edge of the helmet and protects against scratches, impacts and signs of wear and tear
Vent Cover: cover to close the ventilation openings to protect against sun, wind and rain
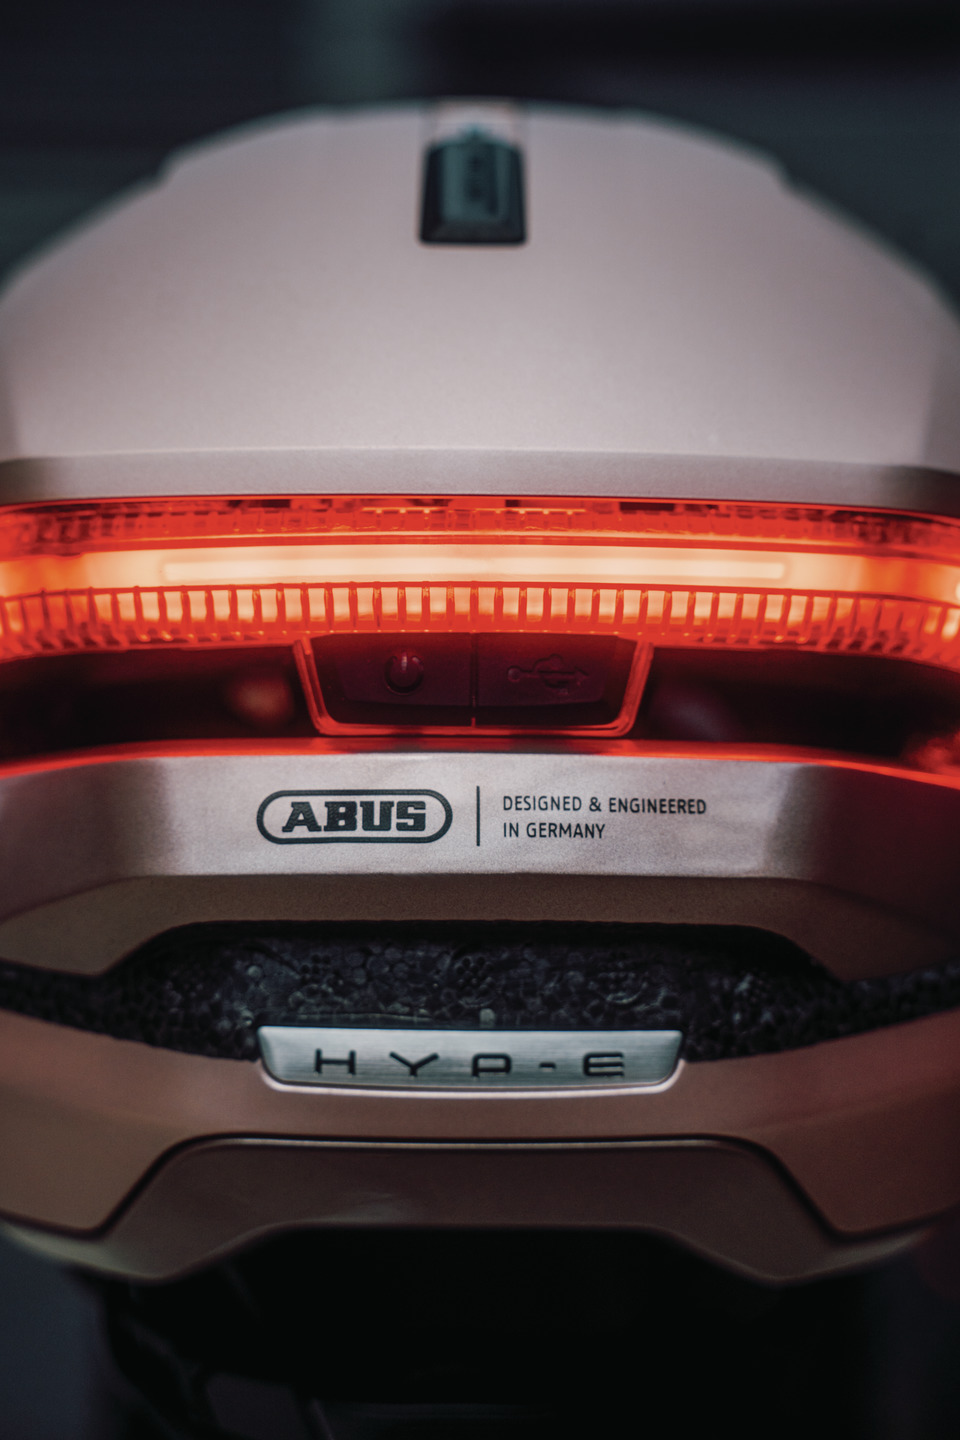
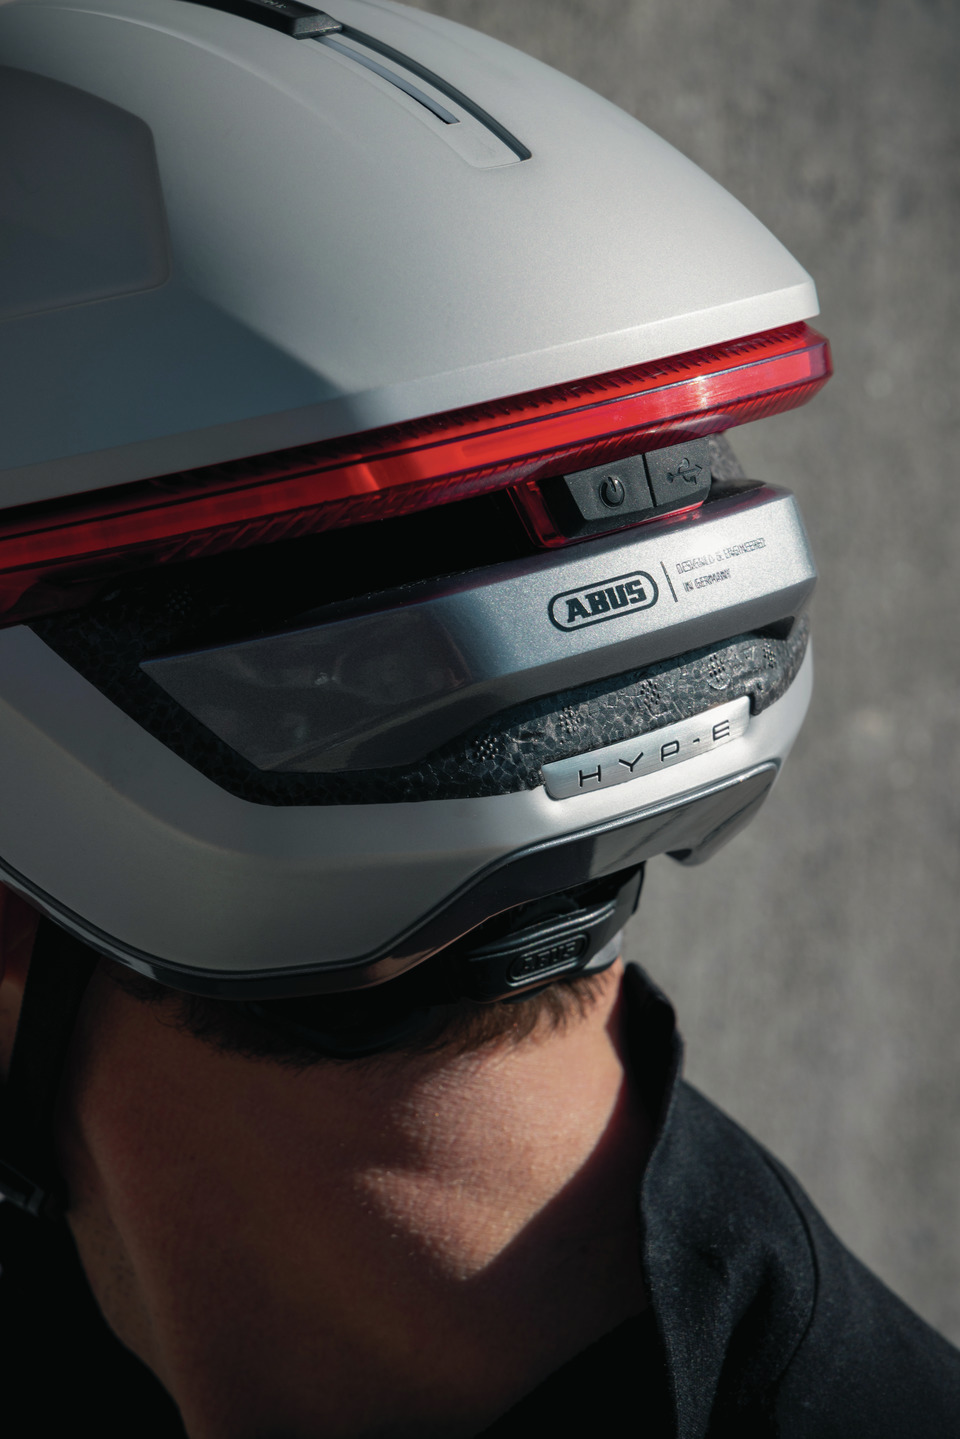
Integrated, rechargeable Front and Rear Lights: lights permanently installed on the front and rear of the helmet for greater visibility in road traffic – can be recharged with a USB-C charging cable
Six different light modes (Rear and Front Lights): Steady, Power, Flow, Pulse, Flash or Eco selectable – depending on light conditions, weather or to save battery capacity
Front and Rear Indicator Light: the front and rear light flash in the turning direction when the handlebar remote control for the indicator light is activated
Remote Control Indicator Light: wireless and USB-C rechargeable remote control for the handlebar to activate and control the indicator light is included
Brake Light (optional): The brake light function at the rear light can be activated with the optional remote control
Operating time per mode in h (min.): depending on the weather conditions and type of use, the available usage time of the light is at least 2 hours in continuous mode and in flashing mode at least 40 hours
Battery charging time (light): the charging time until the battery is fully charged is approximately 4 hours
IP44: protection class that certifies protection against solid foreign bodies larger than 1 mm and against splash water for electronic products such as lights
In-mould process and hard shell application: Combination of both production processes, whereby parts of the outer shell consist of both a robust hard shell and a polycarbonate shell with foamed-in cushioning material
Operation and use
Ponytail Fit: thanks to the opening in the height-adjustable adjustment system, the helmet is also suitable for long hairstyles such as ponytails, buns, or braids
Bug Mesh: keeps flies and other bugs off your head without messing with the helmet's ventilation
Zoom™ Spin adjustment system: rotary wheel at the back of the head for individual adjustment of the helmet to the head size
Flap Divider™: strap divider for individual adjustment of the straps below the ears – with clamp fastener to fix the set position
Magnetic buckle: the straps are fitted with a high-quality, magnetic FIDLOCK buckle to enable the chin buckle to be opened with one hand, even when wearing gloves
Comfort Pads: soft padded inserts for optimum comfort, attached to the helmet with Velcro
Tips
Convenient upgrade: Complete your HYP-E with the matching visor in clear, smoke and photochromic variants – simply purchase as an accessory and clip it into the MagneticHub provided on the HYP-E. Warm ear muffs are also available as accessories.
Washable padding: The removable padding is machine washable at 30 degrees.
How do I pair the helmet with the Remote Control Brake Light? The initial pairing with the helmet is very straightforward:
Switch on the helmet using the On/Off button on the back.
Press and hold the button for around 5 seconds until the Rear Light starts to blink.
Press and hold the button on the Remote Control Brake Light for approximately 3 to 5 seconds until the remote starts to blink (pairing mode).
Wait until the helmet and the Remote Control Brake Light light up green.
The helmet and Remote Control are now connected. The Remote Control is now always ready for use.
When you switch on the helmet, the helmet lights and the Remote Control will connect automatically.
Below you will find the accompanying instructional video:
To view this content, you must agree to the use of cookies.
How do I unpair the Remote Control Indicator Light? Unpair the Remote Control Indicator Light by simultaneously pressing and holding the L and R buttons until the LED on the Remote Control lights up orange. Then, press the left button twice and the right button twice. Once the Remote Control and the helmet have been successfully unpaired, the LED on the Remote Control will light up red.
How do I activate or deactivate the Indicator Light and the Brake Light? The Indicator Light and Brake Light respond to the radio signals from the remote controls. Once the Remote Controls are paired with the helmet, they remain permanently ready for use. Switch on the helmet using the On/Off button to activate the radio connection and attach the Remote Controls to the handlebar or brake lever. When you press one of the ergonomic directional buttons on the Remote Control Indicator Light, the corresponding Indicator Light on the helmet will activate. Pressing the button again, or after an automatic timeout of 40 seconds, will deactivate the Indicator Light. When you engage the brake lever, the Brake Light at the back of the helmet automatically illuminates red; once you release the brake lever, the light turns off.
How do I switch the helmet lights and the remote controls on and off? Activate the Front and Rear Lights using the on/off button on the back of the helmet. Press the button for approximately one second to turn the lights on. A short press afterwards will switch between the available light modes. To switch the lights off, press the button for about two seconds. There is no need to switch off the remote controls separately, as they are paired with the helmet and activated when the helmet is switched on.
What functions does the helmet's On/Off button have? By pressing the On/Off button on the back of the helmet, you activate both the Front and Rear Lights and can choose from various Light Modes. To turn the helmet off again, press and hold the On/Off button for approximately 2 seconds.
Can I pair more than one Remote Control with a single helmet – for example, if I use different bicycles? Yes, the helmet supports pairing with up to 4 Remote Controls. This applies to both the Remote Control Indicator Light and Remote Control Brake Light.
Indicator Light:
If you wish to pair additional Remote Controls, first switch on the helmet, press and hold the On/Off button, and then press the L and R buttons on the Remote Control (pairing mode).
After a successful pairing, both the helmet and the Remote Control will light up green. If no further Remote Controls can be paired, the helmet will signal this by rapidly flashing the entire light bar in orange. To pair additional remote controls, a helmet reset must be performed. With one remote control, an unlimited number of HYP-E can be paired.
Break Light:
Pairing additional remote controls works in the same way as the initial pairing:
Switch on the helmet using the On/Off button on the back of the helmet.
Press and hold the button for approximately 5 seconds until the Rear Light starts blinking (pairing mode).
Press and hold the button on the Remote Control Brake Light for approximately 3 to 5 seconds until the remote control starts blinking (pairing mode).
Wait until the helmet and the Remote Control light up green.
If the helmet can no longer accept any further Remote Controls, it flashes.
How do I reset the helmet to pair new Remote Controls if it was previously paired with too many? To perform a helmet reset, first switch on the helmet. Then, press and hold the power button for 5 to 10 seconds until the entire LED strip slowly flashes. Next, briefly press the power button three times. After the helmet reset, you can pair your remote control with the HYP-E, but you will need to re-pair all other Remote Controls as well.
Below you will find the accompanying instructional video:
To view this content, you must agree to the use of cookies.
Do I need an app or a smartphone to use the Remote Controls? No, you don’t need an app. We use OXI wireless technology. This radio communication system between the Remote Controls, Indicator Light, and Brake Light operates on a 2.4 GHz protocol. It works simply and smoothly – completely free from potential interference from apps, Bluetooth®, or Wi‑Fi. Your Remote Controls and helmet connect quickly and effortlessly at the push of a button. Once initially paired, the remote controls remain permanently operational.
How long does it take to charge the Remote Controls and the helmet lights? In approximately 2.5 hours, the rechargebale batteries in your remote controls for the Brake and Blink Lights will be fully charged. The charging time may vary depending on usage and weather conditions.
Charging duration for the helmet lights:
The charging time for the helmet lights is 4 hours. To start the charging process, first open the cover on the back of the helmet, then insert your USB-C cable into the charging port as usual. Please do not use the helmet during the charging process.
How long do the rechargeable batteries in the Remote Controls and Helmet Lights last? Under average use, the rechargeable battery in the Remote Control Brake Light typically lasts for about one month, while the Remote Control Indicator Light's rechargeable battery lasts between two and four months. Battery life may vary depending on usage and weather conditions.
The runtime of the lights depends on the modes you select.
There are a total of 6 modes available: steady (6 h), power (2 h), flow (11 h), pulse (27 h), flash (8 h) und eco (40 h).
Can I recharge the Remote Controls and helmet lights? Yes, a USB-C cable for recharging is included with all HYP-E variants. If you order a Remote Control as an accessory, a USB-C charging cable is also provided. The power adapter is not included. The Charging Port for the helmet lights is located at the back of the helmet. You can simply remove the Remote Controls and recharge them.
How do I check the charging status of the helmet lights? The charging status of both the Front and Rear Lights is displayed in the centre of the Rear Light each time the helmet is switched on. The LEDs fill this area completely or partially, depending on battery level.
To charge, open the cover on the back of the helmet and insert your USB-C charging cable. The charging process is indicated by a flowing light animation in the centre of the rear light. Once the rechargeable battery is fully charged, the light turns off.
How do I check the battery status of the remote controls for the Indicator and Brake light? Remote Control Indicator Light: If the remote control's rechargeable battery is empty, the LED will remain continuously red – indicating that it must be recharged using a USB-C cable. The Charging Port is located on the underside of the Remote Control, as it contains an integrated rechargebale battery. Depending on usage, the Remote Control needs to be recharged every 2 to 4 months.
Remote Control Brake Light: During charging, the remote's status LED (referred to in the User Manual as the brake sensor) flashes red and turns off once fully charged. While using the Remote Control, you can check the battery level by pressing its button – the indicator shows two colours: green means the battery is sufficiently charged, and red indicates a low battery level. After use, the Remote Control must be recharged every 2 to 4 weeks.
What does the Deep Sleep Mode do?
Deep Sleep Mode: Extending the Battery Life of the Remote Controls Indicator and Brake Light
Deep Sleep Mode – Remote Control Indicator Light:
When the Remote Control Indicator Light is no longer in use, it automatically switches off and enters what is known as Deep Sleep Mode. The next time it is used, it will automatically power back on.
Deep Sleep Mode – Remote Control Brake Light:
To activate Deep Sleep Mode on the Remote Control Brake Light, press the button on the silicone cover three times in a row until the light flickers. To reactivate the remote, press the button once.
Is it possible to pair the Remote Controls with lights from other brands, such as Busch & Müller blinkers? To enable communication between the Remote Controls and the helmet, we utilise the OXI wireless technology from the French company Overade. This system is extremely reliable and, unlike Bluetooth® or app-based solutions, is less prone to interference. For this reason, the remote controls are specifically tailored to your HYP-E model and are not compatible with other helmets, lights, or brands. The only exception is for OXI products that also employ OXI wireless technology.
What is the OXI wireless technology and what does it have to do with my product? The Indicator Light and remote control communicate via a 2.4-GHz radio protocol based on the OXI wireless technology from the French company Overade. It works simply and smoothly – completely free from any potential interference from apps, Bluetooth, or Wi‑Fi..
Can I pair the remote controls with additional OXI lights, for example with an extra OXI Rear Light? Yes, that's possible. OXI products that utilise OXI wireless technology can be paired together.
Can I purchase the Remote Control Brake Light separately for my HYP-E Basic version, or as an optional extra? Every HYP-E version (Basic, ACE, and BL.ACE) comes with a Brake Light function. However, to activate the Brake Light on your HYP-E Basic or ACE version, the Remote Control Break Light must be purchased separately as an accessory. Acquiring the Remote Control Break Light separately and pairing it with the helmet is no problem. In the BL.ACE version, the Remote Control Brake Light is already included, while the Remote Control Indicator Light for controlling the Blink Light is included with every version.
Does the helmet have Indicator Lights at the front and back? Both the Front and Rear Lights on the helmet include the indicator function. The Remote Control for the indicators is included with all three HYP-E versions.
Are there different Light Modes? For the Front and Rear Lights, you can choose between six different Light Modes: steady, power, flow, pulse, flash, or eco—depending on the lighting conditions and whether you want to save battery capacity. Once the helmet is switched on, you can change the Light Mode by briefly pressing the On/Off button on the back of the helmet.
Below you will find the accompanying instructional video:
To view this content, you must agree to the use of cookies.
How bright are the lights? That depends on the lighting mode you chose, for both Front and Rare Light: (Final User Manual will follow)
Can the Indicator Light sound be turned off? Yes, the Indicator Light sound can be turned off by pressing and holding the power button for 5 seconds until a signal tone is heard. This must be done while the helmet is switched off.
Below you will find the accompanying instructional video:
To view this content, you must agree to the use of cookies.
What happens if I forget to turn off the Indicator Light? After 40 seconds, the Indicator Light will automatically switch off to prevent misleading signals to other road users. You can also manually stop the blinking by pressing the corresponding direction button on your Remote Control again.
Why is the helmet particularly suitable for e-bikes? The helmet meets not only CE and CPSC certification standards but also the more demanding NTA 8776 standard, which has stricter testing criteria. Thanks to its extended temple and neck protection as well as thicker EPS material, it is particularly well suited for electrical bycicles with motorised pedal assistance up to 25 km/h, commonly referred to as Pedelecs. In German-speaking countries, these are often called e-bikes.
In the Netherlands, the HYP-E helmet, with its NTA certification, even meets the mandatory helmet requirements for S-Pedelecs. An S-Pedelec provides motor-assisted pedalling up to 45 km/h. While the NTA standard is currently a legal requirement in the Netherlands, it ensures the best possible head protection for higher speeds and motor-assisted riding worldwide.
Always observe the applicable traffic laws in the country you are riding in.
Do I still need to extend my arm when turning, even if I'm using the Indicator Light (Road Traffic Regulations)? Yes, absolutely. The indicator light on the helmet enhances your visibility in traffic and signals your intention to turn at an early stage. However, to comply with traffic regulations in Germany and to improve your safety, you should always extend your arm when turning.
The Indicator Light does not replace hand signals while turning but serves as an additional safety feature to increase visibility on the road. It is also important to use the correct Indicator Light direction and switch it off after completing your turn. If you forget to do so, the Indicator Light will automatically turn off after 40 seconds. Traffic laws may vary from country to country, so please ensure you follow the regulations applicable in your location.
Are lights on the upper head area / on a bicycle helmet allowed in road traffic (especially with Indicator / Brake Light functions)? The helmet's Indicator Light function is a supplement and does not replace the mandatory hand signals when turning. Make sure to activate the correct side when using the Indicator Light. Turn it off after completing your turn by pressing the button again. If not manually switched off, the Indicator Light will automatically deactivate after 40 seconds. The use of Indicator Lights may be subject to legal regulations in different countries. Please observe the laws of the respective country..
Do the lights on the helmet replace bicycle lighting? No. Please follow the road traffic regulations regarding bicycle lighting. The HYP-E enhances your all-around visibility, especially in poor lighting conditions, darkness, or rain.
Are the helmet's electronics (rechargeable battery, charging port) rainproof? Yes, the electronic components are certified to IP44 protection rating. IP44 means that all electronic parts of the helmet are protected against splashing water from any direction and solid foreign objects larger than 1 mm. This is especially important for features like integrated Rear Lights or smart helmet functions, ensuring they work reliably even in rain or dusty conditions. Perfect for everyday use and challenging weather conditions.
Can the electronic components, such as the helmet lights and battery, be replaced? The rechargeable battery and helmet lights can be replaced using ABUS spare parts (independently of each other).
To do this, unscrew the two screws inside the helmet using a Phillips screwdriver. Then, remove the outer shell from back to front, keeping in mind that it is hooked at the front. Next, detach the plug connections on top of the helmet by pulling them apart.
To access the holes for removing the lights, first push the adjustment system downward. Then, pull the rail out of the anchor; otherwise, the hole will be inaccessible. Use a blunt object (such as a pencil) to press through the existing holes and push the lights out. Avoid using sharp objects, as they may damage the lights.
Once removed, insert the new lights into the designated baskets (recesses). Reconnect the plug connections on top of the helmet by pressing them together—do not twist. Finally, place the outer shell back onto the helmet from front to back, ensuring it is hooked in at the front. Secure the screws inside the helmet using a Phillips screwdriver.
Is there a way to cover the Magnetic Hub for the visor with a cap if I'm riding without a visor – otherwise, could dirt accumulate there? Yes, there is. A cover for the Magnetic Hub is being developed and will be included with delivery:
Basic = assembled ACE/BL.ACE attached
Are there any specific guidelines for cleaning the helmet and Remote Controls? Clean your helmet and accessories with a soft cloth or sponge dipped in mild soapy water. Avoid harsh cleaning agents or abrasive materials to prevent scratches or damage to the helmet shell. For more tips on proper helmet care, check out our comprehensive guide
Is the helmet available in different sizes and colours? The helmet is available in three sizes: S (51-55 cm), M (54-58 cm), and L (57-61 cm). The HYP-E Basic version comes in Jungle Green, Gleam Silver, Volcano Titan, and Champagne Gold. The ACE and BL.ACE versions are available in Volcano Titan and Gleam Silver.
Is an XL version planned? An XL size is currently not planned due to low market demand.
How much does the helmet weigh? That depends on the size: Without accessories, the HYP-E weighs approximately 550 g in size S, 580 g in size M, and 610 g in size L.
Can I adjust the helmet size to fit my head circumference? Yes, the helmet features the Zoom™ Spin Adjustment System, allowing for easy, seamless size adjustment via a dial while also providing space for your ponytail.
What types of visors are available? The magnetic visor is available in three versions: Choose from "clear" for better visibility in low light, "smoke" for glare reduction in bright sunlight, or "photochromic" for automatic light adjustment. All three visor types are available as accessories and are compatible with all HYP-E models. Just make sure to select the correct size: S/M fits HYP-E helmets in sizes S and M, while size L is compatible with HYP-E helmets in size L. The ACE and BL.ACE versions include the magnetic visor in the "clear" variant as standard.
Depending on the category, the visor offers different levels of light transmission:
The filter category of each visor is engraved on the side for easy identification.
Do the HYP-E visors offer UV protection? Our magnetic visor provides you with a clear all-around view at any head angle and is seamlessly integrated into the helmet's design with its subtle look. Whether it's protection from insects, dust, wind, rain, or glaring sunlight – the seamless transition to the helmet edge ensures optimal protection for your eyes.
Depending on the visor variant, our HYP-E visors offer varying levels of sun protection. You can find the corresponding category on the protective film of your visor: "clear" provides no sun protection, "smoke" offers moderate protection, and "photochromic" adjusts for moderate to strong sun protection.
Can I wear regular glasses under the visor? Wearing glasses under the helmet visor is generally possible, depending on your head shape and the size of your glasses. Thanks to the Magnetic Hub, the visor can be easily pushed forward to create more space for your glasses. However, please note that wearing glasses while riding is the responsibility of the user. Our visors are made from special materials designed to reduce the risk of shattering in the event of an accident.
Can I replace or remove the visor, or add one to my HYP-E Basic version? Yes, because the visor is not a permanently fixed component. That’s why we developed the patented Magnetic Hub – a visor mount that allows you to quickly attach, remove, adjust, or replace the visor. The HYP-E ACE and HYP-E BL.ACE models come with a clear visor included, while for the Basic version, you can easily order it as an accessory.
Can I attach other ABUS visors to the helmet? To ensure maximum flexibility on the go, we developed the magnetic visor with a matching Magnetic Hub for the HYP-E. Thanks to this solution, the visor is not a fixed component but can be easily attached, removed, or positioned on hold. However, this also means that the helmet is only compatible with the magnetic visor designed for HYP-E models.
Is there a way to cover the ventilation openings on the helmet in bad weather or cold conditions? Yes, inspired by winter sports, we’ve designed integrated ventilation covers within the helmet. If the weather changes, you can easily close the vents using a sliding regulator on top of the helmet to protect yourself from rain and cold. When it gets warm and sunny, simply open them again the same way.
Is the helmet compatible with Ear Pads? For maximum comfort, we have developed special Ear Pads for the HYP-E. They are compatible with the HYP-E, HYP-E ACE, and HYP-E BL.ACE, regardless of helmet size. The ACE and BL.ACE versions include the Ear Pads as part of the standard package. For the Basic version, they can be purchased separately and easily attached to the lower edge of the helmet. The Ear Pads are removable at any time, fit perfectly with the helmet's strap system, and stay securely in place.
Is there a Bug Mesh? No, but the ventilation openings can be closed with the ventilation cover, which also provides protection against insects
Is the helmet also available with MIPS? No, the helmet is not available with MIPS. However, it meets the stricter NTA 8776 standard in addition to CE and CPSC certifications, making it particularly well-suited for e-bikes.